dashBy.js - Documentation
Table of contentsIntroduction
Design of modern devices often requires web dashboards that are capable of real-time interaction with a hardware. This framework aims to minimise development efforts while creating and managing such web based human-machine interfaces. It is wrtten entirely on JavaScript and requires only node.js engine to run back-end application.
It is highly configurable and offers following features: user customisable controls, reach templating, wiki syntax support (textile and markdown), automatic generation of responcive layout.
System owerview
The framework consists of two parts: front-end library dashBy.js and back-end tool dashByServer.js .
The front-end is a script that parses web page, once it is loaded in to a browser and convert special tags in to the controls (gauges, charts, buttons...). Example:
     {::range(throttle){0,100}::}
     {::chart(throttle,speed){400,200,1m30s}::}
Back-end tool provides interface to user applications through ASCII strings over TCP
with following format:<variableName>=<value> Example:
     speed=121.5
     throttle=35
     oil.level=77
     oil.temperature=91.2
     oil.status=ok
Front and back end parts communicate to each other via HTTP and Websocket connections.
Basic HTTP server provided by dashByServer.js allows to load
web pages and necesary resources. Real-time data runs through websocket connection.
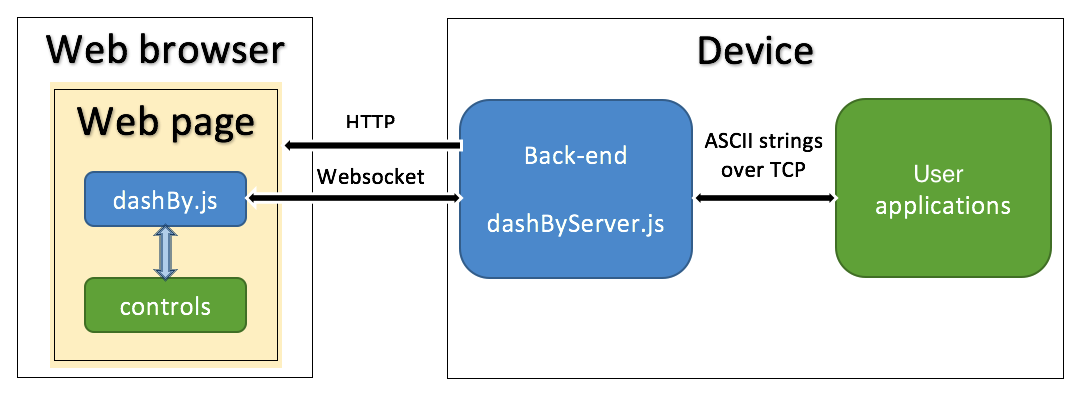
The framework uses event-driven communication model with shared variables. Every control on the web page is subscribed on shared variable(s) and will be updated when the variable value is written at the back-end. The control also can write new value in to the variable so user application(s) will be notified at the back-end side.
User applications can connnect the back-end on dedicated TCP port (default 8000) and use text strings to exchange with web page controls as well as between each other. Simply put, dashByServer.js works as 'chat-room' for all connected clients and web pages.
Using controls
dasbBy framework provides various controls (check here) that can be added to the web page. The only prerequirement is to include following link in to the web page header:
<script type= "text/javascript" src="dashBy.js"> </script>
Then control definition can be inserted inside any <div> tag of the HTML.
dasbBy tags are always framed with
{:: tag_contents ::}
The framing characters is possible to customise, see API for more details.
The control definition uses following generic format:
{:: controlName(variableList){options}... ::}
Where:
- controlName - is name of the control
Examples:number gauge1 chart editbox
Other examples for all avaliable controls can be found here; - variableList - is comma separated list of the variables binded to the control
Examples:speed oil.level, oil.temperatureAnother way of define variables as numbered list as namePrefix[startNumber:endNumber]
Example:Sensor[1:3]is equivalent to:Sensor1,Sensor2,Sensor3 - options - is list of the control options, such as control size, color, min/max range and so on...
Some controls might have more then one options set, like Chart where each curve can be customised using own options set
Examples:{-100,100} {SetValue,55} {400,200,1m30s}{channel1,bar,blue}{channel2,area,red}
The list of controls and their options can be found and tested in a sandbox;
Positioning of the controls
dasbBy framework provides provides possibility to place control at absolute position on the page:
{:: {Xpos, Ypos} controlName(variableList){options}... ::}
Where:
- Xpos, Ypos X and Y position in pixels
{::{350,200}range(myVar1){-100,100}::}
Creating templates
Often controls with same settings (size, color and so on..) used multiple time on the web page.
Just the variables they are linked to can be different.
To reduce usage of long control definition tags a template method can be applied.
The template is definition of the control parameters under given name.
The template uses following generic format:
{:: ? templatelName(variableList){options}... ::}
Where:
- templateName - is name of the template
- controlName - is name of the control
- options - is list of the control options
To create a control inside the web page using template write tag in following format:
{:: templateName(variableList) ::}
Example - the web page have four similar controls linked to differend variables:
 {::gauge1(myVar1){0,-100,100,Label,150,20}{red,-50,yellow,0,blue,50,red}::}
 {::gauge1(myVar2){0,-100,100,Label,150,20}{red,-50,yellow,0,blue,50,red}::}
 {::gauge1(myVar3){0,-100,100,Label,150,20}{red,-50,yellow,0,blue,50,red}::}
The same can be rewritten using template:
{::?myGauge(gauge1){0,-100,100,Label,150,20}{red,-50,yellow,0,blue,50,red}::}
...
{::myGauge(myVar1)::}
{::myGauge(myVar2)::}
{::myGauge(myVar3)::}
Nested files and advanced templating
dashBy framework can include external files during HTML page processing.
Tag format for include is: {::$filename::}
The filename inside tag should be written without extension
and at the back-end *.dby extenstion will be added automatically.
All include files must be placed inside /scripts subfolder of dashByServer.js location.
Example - include file /scripts/myTemplates.dby:
{::$myTemplates::}
Another include tag format allows to search-and-replace contens of the file:{::$filename(replace_list)::}
Here replace_list is comma separated list of serach-and-replace pairs written as:
searchString=replaceString
This form can be particulary useful to define group of the controls as inculde file
then use several times inside HTML but linking to different variables.
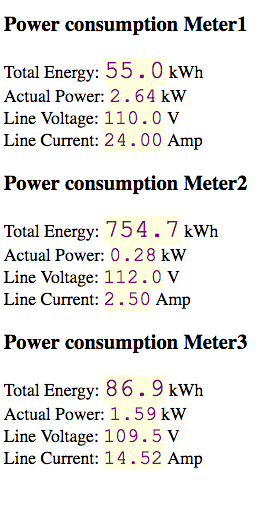
Example - define template to show power meter values as include file
/scripts/meter.dby:
<h3>Power consumption deviceN</h3>
Total Energy:  {::number(deviceN_Energy){1,23,purple,lightyellow}::} kWh <br>
Actual Power:  {::number(deviceN_Power){2,18,purple,lightyellow}::} kW <br>
Line Voltage:  {::number(deviceN_Voltage){1,18,purple,lightyellow}::} V <br>
Line Current:  {::number(deviceN_Current){2,18,purple,lightyellow}::} Amp
Now insert this file inside HTML to display values for 3 different power meters:
  {::$meter(deviceN=Meter1)::}
  {::$meter(deviceN=Meter2)::}
  {::$meter(deviceN=Meter3)::}
As a result first set of the conrols will be connected to shared variables:
Meter1_Energy, Meter1_Power...
Then next set will be connected to:
Meter2_Energy, Meter2_Power...
And the last one to:
Meter3_Energy, Meter3_Power...
Resulted web page will show three group[ of controls, desplaying data from different devices:
Using WiKi Markup engines
dashBy.js library is capable also to render web pages defined with wiki markup syntax. This feature can be switched on by special 'markup' option that needs to be defined in the header of the HTML file.
 <script  type= "text/javascript">
     var dashBy_options={
      'markup': 'markdown'
      };
</script>
The 'markup' option can have three possible values:
'markup': 'none' - syntax processing disabled (default)
'markup': 'markdown' - syntax type is markdown
markup': 'textile' - syntax type is textile
Markdown parsing library marked.js devloped by Christopher Jeffrey and provided under the terms of MIT License.
Textile parsing library textile.js devloped by Borgar Þorsteinsson and provided under the terms of MIT License.
Create responcive webpages
dashBy.js is also capable to autoformat web page with responsive layout.
This feature can be activated by including two lines in HTML header:
 <meta name="viewport" content="width=device-width, initial-scale=1.0">
 <link rel="stylesheet" href="css/dashBy.css">
Now HTML body can be split in to responsive grid columns and raws using special deilmiter tags.
Tag {::|::} marks end of the column and
{::/::} marks end of the raw.
Important: One raw can have up to 5 columns.
Contents of extra columns will not be shown.
<!DOCTYPE html>
 <html lang="en">
 <head>
   <meta charset="UTF-8">
   <title>Responsive layout example </title>
     <meta name="viewport" content="width=device-width, initial-scale=1.0">
     <link rel="stylesheet" href="css/dashBy.css">
     <script  type= "text/javascript" src="dashBy.js"></script>
 </head>
 <body>
 <div>
 Raw 1 cell 1  {::|::} Raw 1 cell 2  {::|::} Raw 1 cell 3  {::/::}
 Raw 2 cell 1  {::|::} Raw 2 cell 2  {::/::}
 Raw 3 cell 1
 </div>
 </body>
 </html>
Responsive styles are implemented using pure.css module that comes under the terms of Yahoo BSD License.
dashBy.js configuration options
The front end features can be configured by adding special variable in the header of the HTML file.
 <script  type= "text/javascript">
      var dashBy_options={
       ...
       };
 </script>
This is the list of available options and their values:
- port - websocket port used to connect the back-end, default: auto
- ws_timeout - websocket connection timeout in msec, default: 2000
- markup - apply wiki formatting (possible options: markdown, textile, none), default: 'none'
- include_path - path to include *.dby files, default: 'scripts'
- loadCallback - call back function() that should be called after dashBy.js finish initialisation.
- sendCallback - call back function(name,value) that should be called before sending new value of variable name to the back-end. When call back function returns false then sending the variable will be cancelled.
- timequant - minimum delay in msec before redrawing the controls, default: 25
- time_profiling - write debug variables with redraw time of every control on the page
(possible options: true, false), default: false. Debug variable names are:
dashBy.time_profiling.<controlType>.control<controlNumber>.redrawtime - prefix - character sequence that marks start of dashBy tags, default: '{::'
- postfix - character sequence that marks end of dashBy tags, default: '::}'
- simulate_websocket - Do not create websocket connection, (options: true, false), default: false
dashByServer.js configuration
By default dashByServer.js opens HTTP server with Websocket suppport
at port 8080
TCP server for local clients connections
opened at port 8000.
Websocket connection timeout is 2000 smec.
These settings can be modified by loading them from an ini file using command line option:
node dashByServer.js -c dashBy.iniHere is example of dashByServer.ini file
       [http]
       port=8080

       [websock]
       timeout=2000

       [TCP]
       port=8000
Controls API
The controls for dashBy.js library defined as separate JavaScript (JS) files placed in to /controls folder. The file name have following format: dashBy_<controlName>.js
The file should content the control implementation code as JS class with constructor and two methods: update and redraw. Constructor called after all resources loaded and the control can be drawn on web page. Update method called when new value of the variable received from the back-end. The update should not change the control view, just modify necessary data inside. Redraw method called when dashBy.js library whants the control to refesh it's view on the screen.
Example of text control implementation:
{::text(variable){
&fontSize,fontColor,backgroundColor,font-style}::}
File dashBy_text.js contents:
      // Control constructor

      function dashBy_text(html_id, channels, options) {
          this.html_id = html_id;
          this.channels = channels;
          this.options = options;
          this.NeedRedraw = true;
          this.value = '-\\\\-';

          this.obj = document.getElementById(html_id); // Find HTML DOM object
          if ((this.obj === null) || (this.obj.length === 0)) {
              console.log("dashBy control text: Error, can't find HTML object with id=" + this.html_id);
              return;
          }

          var myStyle = '';

          if (this.options[0].length > 0) {

              if (this.options[0].length >= 1) {
                  if (this.options[0][0].length > 0) myStyle += 'font-size:' + this.options[0][0] + 'px; ';
              }
              if (this.options[0].length >= 2) {
                  if (this.options[0][1].length > 0) myStyle += 'color:' + this.options[0][1] + '; ';
              }
              if (this.options[0].length >= 3) {
                  if (this.options[0][2].length > 0) myStyle += 'background-color:' + this.options[0][2] + '; ';
              }
              if (this.options[0].length >= 4) {
                  if (this.options[0][3].length > 0) myStyle += 'font-style:' + this.options[0][3] + '; ';
              }
              if (myStyle.length > 0) this.obj.style = myStyle; // Initialise style
          }

          this.obj.innerHTML = "-\\\\-"; // Initialise with dummy value
      };

      // Control update method
      dashBy_text.prototype.update = function (varName, Value, ts) {
          this.value = Value;
          this.NeedRedraw = true;
      };

      // Control redraw method
      dashBy_text.prototype.redraw = function (Forceredraw) {
          if (Forceredraw == undefined) Forceredraw = false;
          if ((this.NeedRedraw == true) || (Forceredraw == true)) {
              if (this.obj == null) return; // skip redraw of if DOM object does not exist
              this.obj.innerHTML = this.value;
              this.NeedRedraw = false;
          }
      };
If the control need to send new value of shared variable to the back-end, it should call global function
dashBy_send(<variableName>,<variableValue>);
Some controls require loading external JS or CSS files before the initialisation.
Such files should be listed in an array named:
var dashBy_<controlName>_require=[];
Example, list of the files to load before gauge1 control initialisation:
var dashBy_gauge1_require = [
                                  'controls/chart_modules/c3/c3.min.js',
                                  'controls/chart_modules/c3/d3.min.js',
                                  'controls/chart_modules/c3/pathseg.js',
                                  'controls/chart_modules/c3/c3.min.css'
                                  ];
Once JS code for the new control developed you might whant to add it to the sandbox for testing. There are two steps you need to do for this:
- Add control name and three examples of its usage in to ctrlinfo.txt file
- Create help file <controlName>.txt with description of the control options
Example of defining text control in the ctrlinfo.txt file:
text {::text(myVar1)::} {::text(myVar1){16,red,lightblue}::}{::text(myVar1){24,purple,lightgreen,italic}::}
The help file is just HTML contents that will be loaded and shown at the bottom of sandbox page.
FAQ
At fast data rates, chart control curves may looks distorted; How this can be fixed?
Such distortion can be caused by communication delays between the back-end and front-end.
dashBy.js assigns a timestamp for each value when it is received at the front-end.
So delayed variables will obtain almost same timestamps even if originally they were sent from user application with regular intervals.
To avoid this problem, user application may assign timestamp to the variables itself.
The string format for a variable with user assigned timestamp is following:
<variableName>@<timestamp>=<value>
The timestamp is number of milliseconds since midnight, 1970-01-01.
Example:
speed@1470933961330=120.3
speed@1470933961557=120.9
speed@1470933962009=121.4
Why my page rendered incomplete ?
If you use responsive layout feature, check that you have not more 5 columns in each row.
Contents of extra columns will not be shown.
Im using another HTTP server on my system, can I disable one in dashByServer.js ?
Not because Websocket and HTTP are served together by dashByServer.js
But you can still use another webserver to load pages and keep dashByServer.js only for Websocket connection.
All that you have to do is to define websocket port inside your HTML files:
 <script  type= "text/javascript">
      var dashBy_options={
       port: '8080'
       };
 </script>
What node modules needs to be installed to run dashByServer.js ?
The server application does not require installation of any additional modules.
However it uses two external modules that are already included in to the distribution:
ini parser/serializer from Isaac Z. Schlueter and Contributors
and nodejs-websocket from Guilherme Souza.
Can the control be placed at arbitrary position on the page ?
Yes, check it here:
Positioning of the Controls
License information
This software provided under the terms of MIT license.
License information for 3'd party modules used in particular controls implementation could be found at
the help section of the sandbox,
(Click on the control template button and see at the bottom of the page).